How To Use Zazzle Quick Create Tool to Upload Designs Fast
If you’re a Zazzle newbie and haven’t started using the Zazzle Quick Create Tool yet then this little tidbit has the potential to increase your product volume in record time. If you have been using Zazzle for a while now, but the Zazzle quick create tool has always stumped you, then this guide is going to be just what you are looking for.
The Zazzle quick create tool has stumped many, with little to no proper explanation to be found anywhere on the web. I’ve now got it down to a science and am here to help you scale your Zazzle print on demand product creation.
Steps 1-2 will show you how to set up the Zazzle quick create tool and category template. Once that is done you will only need Steps 3-5 to create endless products.

(If you have no idea what Zazzle is or anything about Print on Demand read this post)
Need more info about Zazzle? Check out my income report here, where I made over $5,000 USD in one month.

STEP 1: SET UP YOUR ZAZZLE QUICK CREATE TEMPLATE CATEGORY
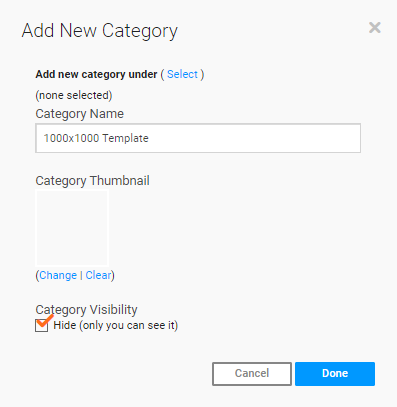
First, we need to set up our template category in our Zazzle shop. This is very simple go to your store and categories and add new category. Title the category something like template or 1,000×1,000px template to reflect the image size. Make sure to select Hide under Category Visibility.
STEP 2: SET UP YOUR TEMPLATE DESIGN FOR THE ZAZZLE QUICK CREATE TOOL
In order to set up the quick create tool properly, you will need to decide on a list of products that you like designing on. You can choose up to 40 products. Personally, I like all-over-print products with seamless pattern designs, so that is what we will use in this guide. But do whatever works best for you!
In this example, we will choose 5 all-over-print products. Throw pillows, tote bags, blanket, leggings, and yoga mats.
Now we need to create our first pattern. An important thing to note is that every design from here on out needs to be the same size. Our example image is going to be 1,000×1,000pixels. (And of course 300dpi.)
Go to create and select your first product, throw pillows. Add your template design, tile it, make it a template object, click done and sell design.

As I’m sure you’re aware this brings us to the “Post Product for Sale” page.
This is a template product, so in the title, description, and tag all you need to write is “template”.
Make sure to change the Category from New Products and select your new template category
Under Additional Information, you need to select Hidden.
Set your royalty rate, select publish, and rinse and repeat.
Repeat this process for each of the other products you want in your Zazzle quick create designs on.
Now when you go to your new template category it should look a little something like this.
STEP 3: CREATE YOUR DESIGN TO ADD TO ZAZZLE QUICK CREATE TOOL
Now you’ve laid down the groundwork and you can add new designs to multiple products with ease. (Yay!)
Make sure whatever design you wish to add is the same size, so in this instance, it needs to be 1,000 x 1,000 px.
Click on Quick Create and select the Use Your Own Template Option.
(1) This is where you select the template category that we just set up.
(2) Select to change the image. Upload and select the design of your choice.
(3) Select the fit. If you kept with the same image size you can leave it to the default. If your image is not quite the same size, you can choose the “fit” option. But this may require some adjustments in the next step.
Click done and voila!
STEP 4: QUICK PRODUCT CREATE
You should now see your products with your design on them.
You can go in individually to customize each product if you need to tweak anything. In the customization pop up you can adjust things as you see fit. Click on the cog option for more advanced options, such as tiling, locking objects, or adjusting template objects.
Once you are happy with everything, check off the boxes of each product you want to post or click Select all and Next>>.
STEP 5: PRODUCT INFO AND PRICING
Woohoo! You’ve made it to the final step.
This is just like normal, except you only have to type the title, description, and tags in once for all of those products. Easy peasy.
Don’t worry about adding the product type as Zazzle will automatically add it to the end of the title for each product.
Select your tags, additional information, and royalty rate as usual and post!
The one downfall about the Zazzle quick create tool is that the products go into review and take a little longer to show up in your store once published. Up to a day or more. So be patient and just keep designing!
Hopefully, these instructions were simple and straightforward and you are now able to get a lot of use out of the Zazzle quick create tool.
Remember, now that you have set up your template category, you will only need to repeat steps 3-5 going forward.
Please use the contact us form if you have any questions about the tool or other tutorials you may want or need for Zazzle!