How To Create Low Content Books for Free to Sell on Amazon – A Step by Step Guide
Amazon’s Kindle Direct Publishing (KDP) is a little known way to potentially make big money. KDP is an online platform you can upload your own self-published books to sell on Amazon’s marketplace. Amazon will print the book for you as you make sales and you will earn 60% of the price less printing costs. We are going to teach you how to create low content books so you can start getting in on the KDP action.
 There are so many different types of low content books. Here are some examples of popular low content books on Amazon to give you a better idea of what they are.
Disclaimer: This post may contain affiliate links. We may earn a small commission for purchases made through links in this post, at no extra cost to you.
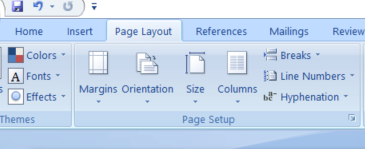
 In the next step in learning how to create low content books, we will set up our margins.
Under Page Layout click to drop down the Margins menu and select “Narrow.” Done.
Finally, we will add our lines.
Go to Insert, and click to drop down the Table menu. Select “Insert Table.” In the insert table pop up under Table Size select 1 column and 40 rows. The number of rows varies depending on spacing, so play with it a little bit.
In the next step in learning how to create low content books, we will set up our margins.
Under Page Layout click to drop down the Margins menu and select “Narrow.” Done.
Finally, we will add our lines.
Go to Insert, and click to drop down the Table menu. Select “Insert Table.” In the insert table pop up under Table Size select 1 column and 40 rows. The number of rows varies depending on spacing, so play with it a little bit.
 Author: Type in your author name. You do not have to use your real name if you don’t want to.
Contributors: Another optional section. You can fill in any names of those that took part in the making of your book.
Description: This is what appears on the book’s detail page when customer’s are viewing it. The description does not get picked up by the Amazon search engine, but it does get picked up by outside search engines such as Google. So it’s up to you if you want to work on a keyword rich description to hopefully get picked up in Google searches.
Publishing Rights: Assuming you are following along with these steps and creating your own book cover and interior, you should be checking off that you own the copyrights and necessary publishing rights here.
Keywords: Here is your chance to add quality long tail keywords to get found among the thousands of other books on the Amazon Marketplace. Aim for a phrase that is 3 words or more. Make coherent phrases that people might be typing into the search bar.
There are a number of keyword research programs out there to help you come up with these phrases. Some people prefer to come up with long tail keywords first, and then make a design to suit those keywords.
Categories: If your book has a specific niche then picking a category is quite simple. If you are just making lined journals with abstract cover designs you might be on the fence with which category to choose from. Choose whatever you think fits best. Nonfiction or non-classifiable are fine to choose.
Check out our post about how to add additional categories to your KDP books here.
Adult Content: This is pretty self explanatory.
Click save and continue and move on to the next page of loading your book!
Now you are on the Paperback Content page.
Print ISBN: Unless you have you own ISBN, Amazon can assign you a free KDP ISBN. This is the simplest solution. Click on the “Assign me a free KDP ISBN” button and “Assign ISBN”
Publication Date: Assuming you are following along with the steps above, you can leave this blank.
Print Options: This depends on what kind of book you have created. Based on the steps above, without the watermark, we select “Black & White Interior with Cream Paper,” “6 x 9 in,” “No Bleed,” and “Matte.”
Manuscript: Now you can upload the lined interior that you created earlier. Upload the PDF file you saved.
Book Cover: Select “Upload a cover you already have” and click to upload your book cover in PDF format.
Book Preview: Now you are ready to preview your book. Click “Launch Previewer.” It usually takes a minute or two to load, so be patient.
Once you are happy with the book preview click on Save and Continue to get to the Rights & Pricing page.
If you do your research you will come to find that simple lined journals don’t sell for that much. Research will tell you to price your book between $6-9 which is a $2-4 royalty per book sold. So once you crunch some numbers you’ll start to realise that this is not a get rich quick scheme. It takes time to build up your collection of books, but once you get a few consistent seller it starts to snowball.
Find some unsaturated niches that people are passionate about and build a collection of books for that niche. Or, stick to evergreens, it will be a much more saturated market, but if you can get a couple of good sellers in an evergreen niche you can make a lot of consistent sales. It’s all trial and error, so find the method that works best for you and stick with it.
Practice and learn how to create low content books that are niche specific with high quality designs.With some quality keywords, persistance and a little bit of luck, you could be seeing big returns from your uploads.
Good luck!
Author: Type in your author name. You do not have to use your real name if you don’t want to.
Contributors: Another optional section. You can fill in any names of those that took part in the making of your book.
Description: This is what appears on the book’s detail page when customer’s are viewing it. The description does not get picked up by the Amazon search engine, but it does get picked up by outside search engines such as Google. So it’s up to you if you want to work on a keyword rich description to hopefully get picked up in Google searches.
Publishing Rights: Assuming you are following along with these steps and creating your own book cover and interior, you should be checking off that you own the copyrights and necessary publishing rights here.
Keywords: Here is your chance to add quality long tail keywords to get found among the thousands of other books on the Amazon Marketplace. Aim for a phrase that is 3 words or more. Make coherent phrases that people might be typing into the search bar.
There are a number of keyword research programs out there to help you come up with these phrases. Some people prefer to come up with long tail keywords first, and then make a design to suit those keywords.
Categories: If your book has a specific niche then picking a category is quite simple. If you are just making lined journals with abstract cover designs you might be on the fence with which category to choose from. Choose whatever you think fits best. Nonfiction or non-classifiable are fine to choose.
Check out our post about how to add additional categories to your KDP books here.
Adult Content: This is pretty self explanatory.
Click save and continue and move on to the next page of loading your book!
Now you are on the Paperback Content page.
Print ISBN: Unless you have you own ISBN, Amazon can assign you a free KDP ISBN. This is the simplest solution. Click on the “Assign me a free KDP ISBN” button and “Assign ISBN”
Publication Date: Assuming you are following along with the steps above, you can leave this blank.
Print Options: This depends on what kind of book you have created. Based on the steps above, without the watermark, we select “Black & White Interior with Cream Paper,” “6 x 9 in,” “No Bleed,” and “Matte.”
Manuscript: Now you can upload the lined interior that you created earlier. Upload the PDF file you saved.
Book Cover: Select “Upload a cover you already have” and click to upload your book cover in PDF format.
Book Preview: Now you are ready to preview your book. Click “Launch Previewer.” It usually takes a minute or two to load, so be patient.
Once you are happy with the book preview click on Save and Continue to get to the Rights & Pricing page.
If you do your research you will come to find that simple lined journals don’t sell for that much. Research will tell you to price your book between $6-9 which is a $2-4 royalty per book sold. So once you crunch some numbers you’ll start to realise that this is not a get rich quick scheme. It takes time to build up your collection of books, but once you get a few consistent seller it starts to snowball.
Find some unsaturated niches that people are passionate about and build a collection of books for that niche. Or, stick to evergreens, it will be a much more saturated market, but if you can get a couple of good sellers in an evergreen niche you can make a lot of consistent sales. It’s all trial and error, so find the method that works best for you and stick with it.
Practice and learn how to create low content books that are niche specific with high quality designs.With some quality keywords, persistance and a little bit of luck, you could be seeing big returns from your uploads.
Good luck!
Low, or no, content books are a great way to enter the self publishing book industry. From there you can learn to build planners, schedulers, coloring books and just about any other kind of book you can imagine. Not to mention have the skills to publish your very own novel or kids book. Below we will outline the step by step process of how to create low content books to sell on the Amazon marketplace. The book we will show you how to create will be a 100 page lined journal. You can add any elements you may like to make the journal more unique.
More KDP Articles for you:
- Where to Sell Low Content Books Online
- 22 Low Content Book Niche Ideas
-
How To Find The Best Keywords For Amazon KDP – Try it for free!
-
How To Create Dot Grid Journals for Free to Sell on Amazon KDP
-
How to Add Amazon KDP Categories to Get More Eyeballs on Your Books
- Where to Buy Low Content Book Interiors
- 50 Best Selling Low Content Books on Amazon
Disclaimer: This post may contain affiliate links. We may earn a small commission for purchases made through links in this post, at no extra cost to you.
STEP 1 – HOW TO CREATE LOW CONTENT BOOK INTERIORS
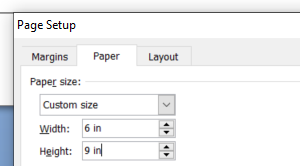
Open a new blank document in Word. We are now going to set up your page size: Go to Page Layout and click on Page Setup. In the Page Setup pop out window next to Width you will type in “6 in” and next to Height “9 in.” Press ok. Setting up your page size is now done. Easy! Optional: To add a background image, or watermark, go to the Page Layout section and select the dropdown menu for Watermark. Select “Custom Watermark.” In the Printed Watermark Pop Up window select “Picture Watermark” and click on “Select Picture.” You can choose any photo you would like, maybe some nice graphics. You can find cool graphics at Creative Fabrica and Creative Market. Just make sure to double check the licensing on everything you use.
Once you are satisfied with the look of your interior, save the document as a PDF. That’s it! You’ve created your interior and you can move on to Step 2 of how to create low content books to sell on the Amazon marketplace.
STEP 2 – HOW TO CREATE LOW CONTENT BOOK COVERS
Depending on what size journal you are creating you will need to check out Amazon’s specifications for the size of the cover here. In this example, we are creating a 6 x 9 inch 100 page lined journal. Once you’re on the Paperback Cover Templates page, select your book size under trim size, and type your page count in. Next, download your cover template outline. Upload the PDF into your photo editing software. For free software, you can use photopea.com, no download is necessary. But if you plan to get serious and pursue this full time, we highly recommend getting adobe photoshop and/or illustrator. Once the PDF is uploaded in your design software you will have your guidelines and know exactly where your design will show up on the book cover. Start designing in another layer on top of the book cover template. For graphics check out Creative Fabrica or Creative Market they have both free and paid options. Always double check the licensing before using any graphics. Once complete, save as a PDF.
STEP 3 – LOAD YOUR BOOK INTO AMAZON KDP
Amazon makes it fairly straightforward, but here is a quick walkthrough of how to load your new book onto the Amazon KDP market. Under Create New Title click on + Paperback. Now you are on the Paperback Details page. First, choose your language. Title: The title must be on the cover of the book somewhere. Subtitle: This is optional, but has no regulations. This is a good place to add your title keywords that are not on the cover of your book. Series: If this is a lined journal you can just leave this section blank. Edition Number: If you are uploading a book that you have just created you can leave this section blank.Do you need help making low content book interiors and exteriors more efficiently? Creative Fabrica has a MASSIVE collection of fully made, ready to go, book interiors to download as well as countless graphics to add to your covers! I’ve been a member of Creative Fabrica since 2020 and can’t say enough good things about their catalogue of products. Get your first month for $1 here. OR use code: allaccessspecialevent to get your first year for $59.00 – this is a limited time deal.
This section is fairly simple… Territories: Decide if you would like your book to be available worldwide or only in specific locations. Pricing & Royalty: Here you can set the list rate which sets your royalty rate. You make 60% of the of list price less the cost of printing. You can also choose for your book to be available in expanded distribution. This means that your book will be put in a catalogue and could get chosen to be displayed in other online and physical stores. Once you are happy with your royalty rate you are ready to Publish!
Recommended for you:
- Where to Sell Low Content Books Online
- 22 Low Content Book Niche Ideas
-
How To Find The Best Keywords For Amazon KDP – Try it for free!
-
How To Create Dot Grid Journals for Free to Sell on Amazon KDP
-
How to Add Amazon KDP Categories to Get More Eyeballs on Your Books
- Where to Buy Low Content Book Interiors
- 50 Best Selling Low Content Books on Amazon